Cancel
Start searching
This search is based on elasticsearch and can look through several thousand pages in miliseconds.
Learn more

In order to save time and avoid errors when installing new servers, the implementation of a fully automated installation of new systems was high on our list of priorities. Starting servers via PXE [1] is of course nothing new. The operation of FreeBSD over the network is also quite well documented. [2]
What is new, however, is the unattended, fully automated provisioning of systems from "bare metal" to an operational FreeBSD/ZFS-based hosting platform.
Modern remote management such as IPMI enables us to install a large number of servers "in stock" in the racks and provide them with all the necessary connections - but leave them switched off. Switched on remotely, the systems virtually install themselves, reloading the Chef.io management platform we currently use and registering with the central Chef server. Further parameterization (installed and active software, network configuration, user accounts) is then carried out using Chef.
There are four phases to booting a FreeBSD system from the network:
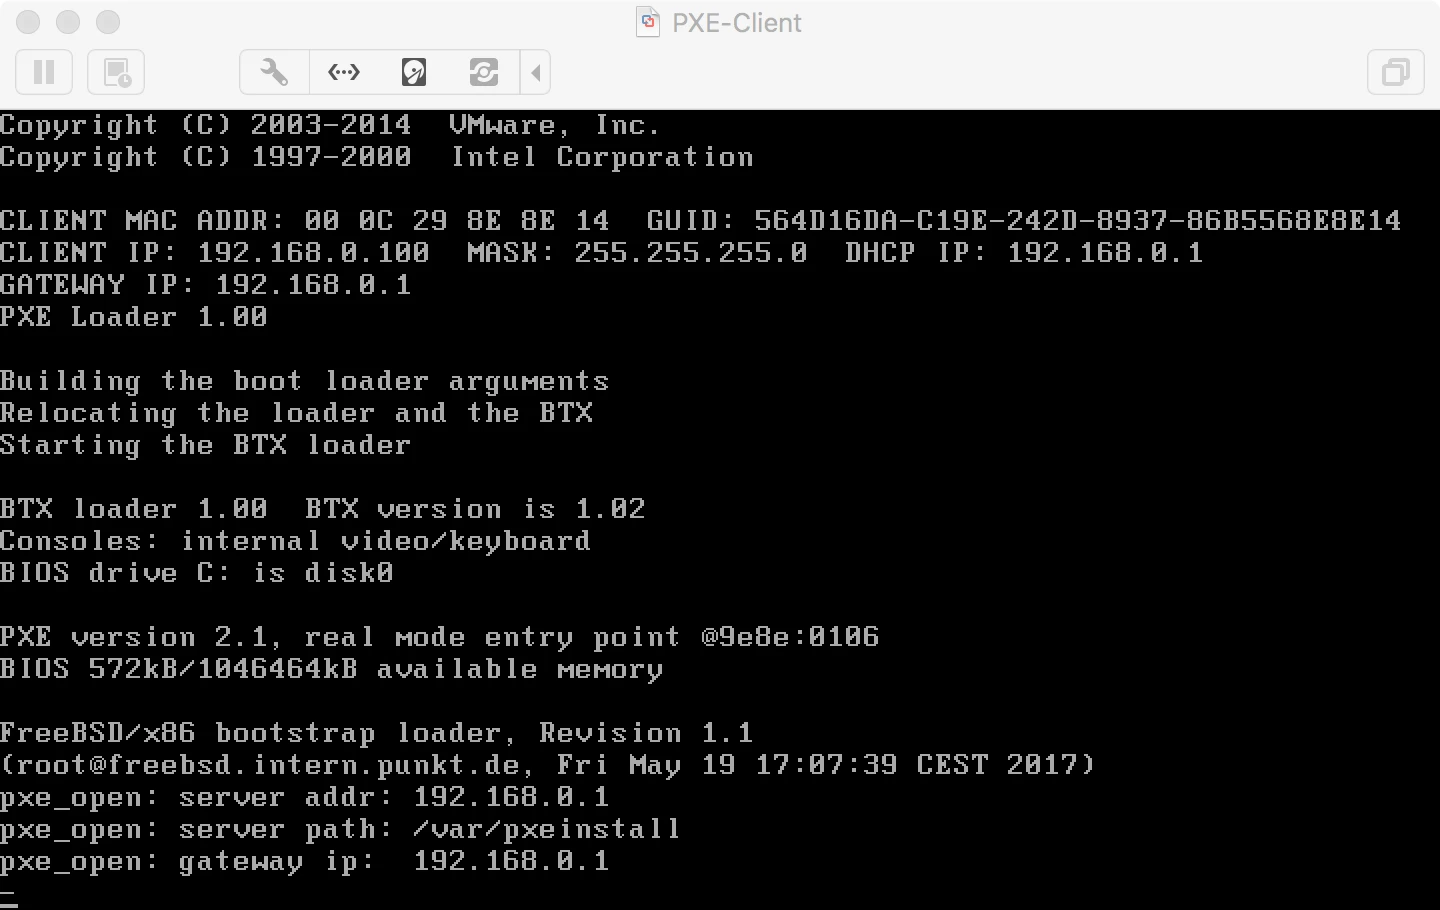
The preboot execution environment integrated into the BIOS or the option ROM of the network card requests a locally valid IPv4 address via DHCP. The parameters next-server and filename of the DHCP response contain the information where exactly the FreeBSD boot loader can be found.
The boot loader determined in the first step is loaded into the computer via TFTP and control is transferred to it.
The boot loader then loads the kernel and any other specified modules. In FreeBSD, this is done via NFS instead of TFTP, just like the next step!
The kernel initializes the hardware as usual and then attempts to mount the root file system. In contrast to most Linux distributions, which use RAM disks for this purpose within such environments, which are also reloaded via TFTP, FreeBSD always uses NFS. This corresponds to the traditional "diskless" operation of workstations from Sun Microsystems, for example. The kernel receives the NFS server and path from the boot loader, which has received this information via the DHCP option root-path.
N.B. There are a large number of "HowTo" documents on the net that go to great lengths to avoid the need for NFS. In most cases, external tools from the Linux area are used to create a RAM disk to be reloaded via TFTP. In my opinion, these steps are unnecessary, as there is no reason not to use NFS within an isolated installation environment. Especially as this architecture simplifies many things in retrospect. (see below)
If the root file system can be successfully mounted, /sbin/init is called as in local operation and the system starts as usual.
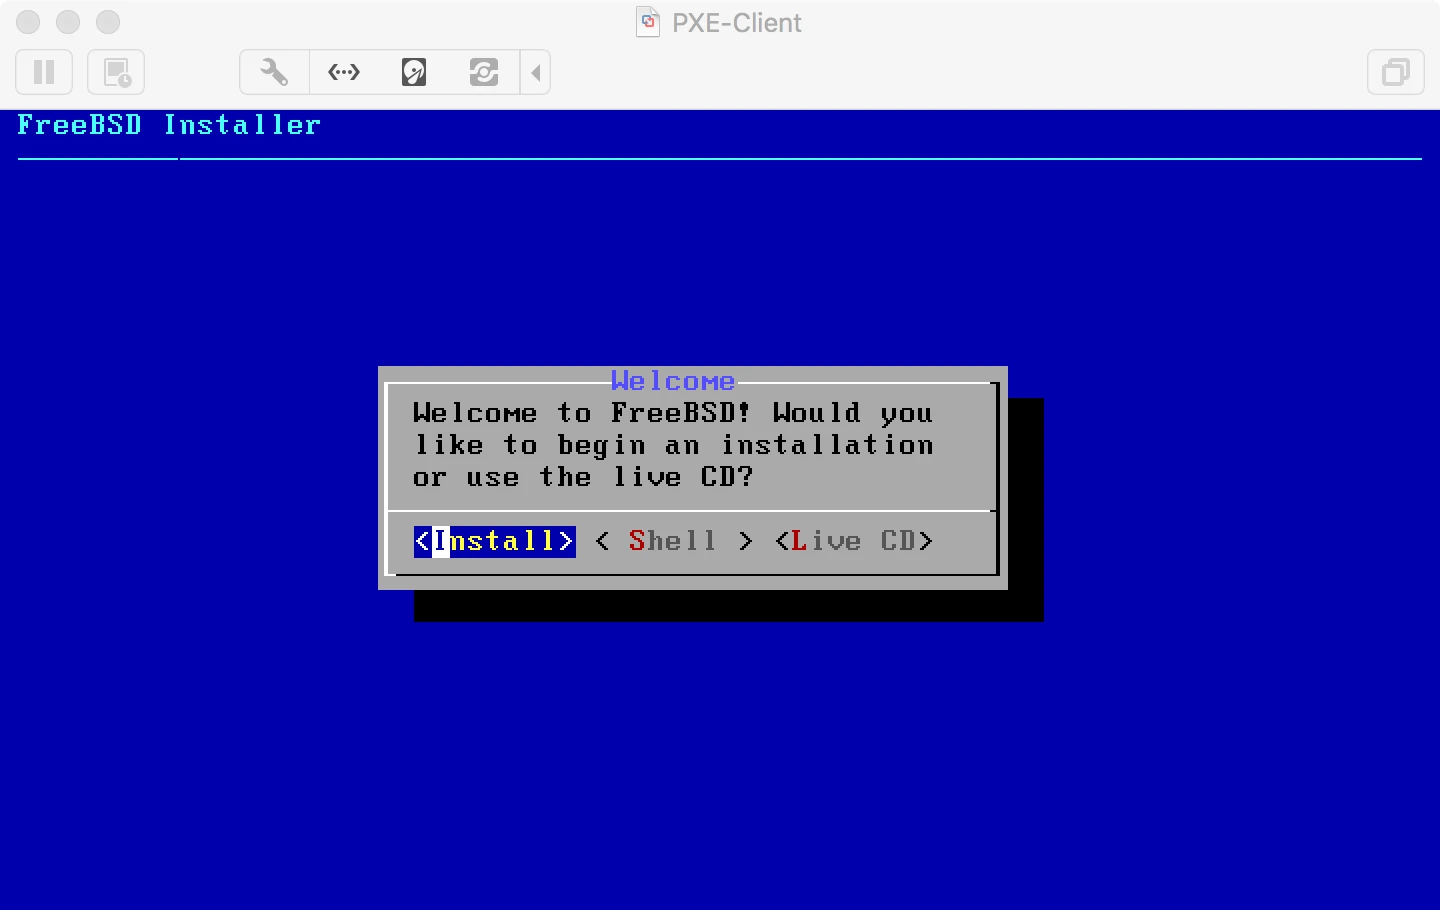
If an image of a FreeBSD installation medium is used as the root file system, the system boot leads directly to the FreeBSD installer bsdinstall.
This already enables an interactive installation as when booting from CD/DVD/USB drive. If the installer finds an /etc/installerconfig file in the root file system that contains the correct instructions, the installation can also run fully automatically until the newly installed server is rebooted and ready for operation.

The installation takes place in an isolated private network. The PXE install server performs the following tasks:
The latter is necessary so that the systems to be installed can reach Internet resources and other systems in our data center (package repository, Chef server, ...). The implementation of routing and NAT on the install server itself helps to keep all required services consistently in one place.
In our example implementation for this article, the entire setup exists within VMware Fusion on an Apple Mac laptop. A new network is created within VMware for the private VLAN. It is important that VMware's own DHCP server is not activated here!
In my case, this network is called vmnet2 in VMware.
Our installation server uses the same FreeBSD version that we install on the hosting systems. At the moment (May 2017) this is FreeBSD 11.0p10
The installation server itself has two network interfaces. One is external with Internet access, the other is in the private installation VLAN:
# Hostname des Systems
hostname="pxeinstall.intern.punkt.de"
# Innerhalb von VMware externe IP–Adresse per DHCP
ifconfig_em0="DHCP"
# Private IP–Adresse statisch (RFC 1918)
ifconfig_em1="inet 192.168.0.1/24"
/etc/rc.conf
The server must also be configured as a router and NAT gateway:
# NAT aktivieren und externes Interface festlegen
firewall_enable="YES"
firewall_type="open"
firewall_nat_enable="YES"
firewall_nat_interface="em0"
# Routing aktivieren
gateway_enable="YES"
/etc/rc.conf
pkg install ca_root_nss isc-dhcp43-server bind910All other services are included in the FreeBSD base system.
The DHCP server is activated globally:
dhcpd_enable="YES"
dhcpd_ifaces="em1"
/etc/rc.conf
and configured:
# Globale Parameter
default-lease-time 600;
max-lease-time 7200;

ddns-update-style none;
authoritative;
log-facility local7;

# Unser Installations-Netz
subnet 192.168.0.0 netmask 255.255.255.0
{
    option routers 192.168.0.1;
    option subnet-mask 255.255.255.0;
    option domain-name "intern.punkt.de";
    option domain-name-servers 192.168.0.1;
    use-host-decl-names on;

    # PXE-Boot Parameter
    next-server 192.168.0.1;
    filename "pxeboot";
    # Root-Filesystem per NFS
    option root-path "192.168.0.1:/var/pxeinstall";
}

# Jeder einzelne Hosting–Server hat ab hier einen statischen Eintrag mit
# seiner MAC-Adresse und einer individuellen IPv4-Adresse

# hosting00.intern.punkt.de
host hosting00 { fixed-address 192.168.0.100; hardware ethernet 00:0A:E4:88:AB:04; }
/usr/local/etc/dhcpd.conf
By dispensing with a range statement within the DHCP configuration, only explicitly listed servers receive a response to DHCP requests. This prevents systems from unintentionally performing a network boot and overwriting whatever is already on their hard disks.
The name server is activated:
named_enable="YES"/etc/rc.conf
and configured - here we ensure that it can only be accessed from the private network and not from the Internet:
listen-on { 127.0.0.1; 192.168.0.1; };/usr/local/etc/namedb/named.conf
The TFTP server service is easy to configure, it is integrated via inetd, which is restricted to the private address:
inetd_enable="YES"
inetd_flags="-wW -C 60 -a 192.168.0.1"
/etc/rc.conf
tftp dgram udp wait root /usr/libexec/tftpd tftpd -l -s /tftpboot /etc/inetd.conf
The TFTP directory is located within the PXE installation environment that we will create in the next step. Therefore, we first set a symlink:
ln -s var/pxeinstall/boot /tftpboot The environment already provided via TFTP must now also be exported via NFS. We make sure that the server can only be accessed in the private VLAN:
rpcbind_enable="YES"
rpcbind_flags="-h 192.168.0.1"
mountd_enable="YES"
mountd_flags="-r -h 192.168.0.1"
nfs_server_enable="YES"
nfs_server_flags="-t -u -h 192.168.0.1"
/etc/rc.conf
/var/pxeinstall -ro -maproot=root -network 192.168.0.0 -mask 255.255.255.0/etc/exports
For the files that the hosting server "pulls" via TFTP as well as for the NFS root file system, we need a current FreeBSD installation CD. We can download this from the usual servers or create it ourselves. One of the advantages of FreeBSD is that an installation medium can be generated from the sources of the complete system with one command, which not only has the latest release version but also exactly the current patch level.
Provided the installation server has sufficient time and performance, the procedure is as follows:
1. Check out the source code
# "svn" Kommando bereitstellen, was das spaetere Update der Sourcen vereinfacht.
# "svnlite" ist im Basissystem enthalten.
mkdir -p /usr/local/bin
ln -s ../../bin/svnlite /usr/local/bin/svn

# Dem Build-System mitteilen, dass wir Updates zukuenftig per "make update" durchfuehren wollen
echo "SVN_UPDATE= yes" > /etc/make.conf

# Source von FreeBSD 11.0 mit aktuellem Patchlevel auschecken
svn co https://svn.freebsd.org/base/releng/11.0 /usr/src

# Updates koennen danach jederzeit so durchgefuehrt werden
cd /usr/src && make update
2. Build system
This step takes a little time :-)
cd /usr/src && make buildworld buildkernelRun once initially and after each update of the sources via make update.
3. Create installation medium
cd /usr/src/release && make NOPORTS=1 NOSCRC=1 NODOC=1 NOPKG=1 cdromThe result is a file with the name disc1.iso in the directory /usr/src/release.
Alternatively, you can download the latest release version from the documented servers. Now continue with this disk image.
4. Mount and copy the root file system
mdconfig -a -t vnode -f /usr/src/release/disc1.iso
mount -t cd9660 /dev/md0 /mnt
cd /mnt
mkdir -p /var/pxeinstall && find -d -x . | cpio -pdum /var/pxeinstall
cd
umount /mnt
mdconfig -d -u 0
Then comment out a line in the fstab of this installation system that only makes sense when booting from a CD:
# /dev/iso9660/11_0_RELEASE_P10_AMD64_CD / cd9660 ro 0 0/var/pxeinstall/etc/fstab
Enter the MAC address of the new hosting server in dhcpd.conf (see above) and start the DHCP server:
vi /usr/local/etc/dhcpd.conf
service isc-dhcpd restart
Then boot the new hosting server.
The result should look like this:
After a reboot, the system is now ready for an interactive installation via the network. It is advisable to test this once.
Congratulations! You have deployed a FreeBSD Network Installation Server!
The "new" FreeBSD installer called bsdinstall searches for an /etc/installerconfig file at startup. If this file exists, it is read in and the instructions specified in it are applied. In this way, a completely unattended installation is possible.
This is where the advantage of the NFS-based approach becomes apparent. The file can be easily changed on the install server, or one of several alternatives can be selected, e.g. for different hardware (hard disks, network interfaces, ...). This is immediately effective in the install environment, i.e. the next start of a server to be installed always takes place with the current file.
The file is in shell syntax and consists of two parts. These are separated by a blank line. The first part defines variables that control bsdinstall. The second part is a shell script that is executed as the last action before the end of the installation. In this script, we are completely free to do whatever is necessary, as the install server also provides Internet access in the installation VLAN via NAT and DNS.
What needs to be installed?
DISTRIBUTIONS="base.txz doc.txz kernel.txz lib32.txz"/var/pxeinstall/etc/installerconfig
Which network interface is used for the installation?
INTERFACES="em0"/var/pxeinstall/etc/installerconfig
This refers to the interface of the server to be installed, via which it also boots.
ZFS hard disk layout
export nonInteractive="YES"
export ZFSBOOT_DISKS="da0 da1"
export ZFSBOOT_VDEV_TYPE="mirror"
export ZFSBOOT_FORCE_4K_SECTORS="1"
export ZFSBOOT_SWAP_SIZE="8g"
export ZFSBOOT_SWAP_MIRROR="1"
export ZFSBOOT_POOL_CREATE_OPTIONS="-O compress=lz4 -O checksum=fletcher4"
export ZFSBOOT_BEROOT_NAME="ROOT"
export ZFSBOOT_BOOTFS_NAME="default"
export ZFSBOOT_DATASETS="
    /$ZFSBOOT_BEROOT_NAME mountpoint=none
    /$ZFSBOOT_BEROOT_NAME/$ZFSBOOT_BOOTFS_NAME mountpoint=/
    /tmp mountpoint=/tmp,setuid=off
    /usr mountpoint=/usr,canmount=off
    /usr/local mountpoint=/usr/local
    /var mountpoint=/var
    /var/db mountpoint=/var/db,canmount=off
    /var/db/mysql mountpoint=/var/db/mysql,recordsize=16k,atime=off,primarycache=metadata
    /var/db/mysql/logs mountpoint=/var/db/mysql/logs,recordsize=128k,atime=off,primarycache=metadata
    /var/db/pkg mountpoint=/var/db/pkg
    /var/tmp mountpoint=/var/tmp,setuid=off
    /home mountpoint=/home
"
/var/pxeinstall/etc/installerconfig
This creates a mirror pool on the two existing hard disks and creates ZFS datasets as described. These are of course tailored to our specific hosting environment and may need to be adapted. The devices of the hard disks may also be named differently. SCSI → da0, AHCI → ada0.
The above instructions must not contain a blank line! This would end the first part with the parameters and introduce the second part with the shell script. The latter can then be formatted as desired, even with blank lines.
In the shell script, we first create the file /etc.rc.conf in the installed system. Adapt the network interface accordingly!
#!/bin/sh
cat >>/etc/rc.conf <<EOF
keymap="de"
zfs_enable="YES"
ifconfig_em0="DHCP"
sshd_enable="YES"
netwait_enable="YES"
netwait_ip="192.168.0.1"
netwait_timeout="60"
EOF
/var/pxeinstall/etc/installerconfig
We then set the root password so that we can log in via the console:
echo 'ROOT_PW_HASH' | pw user mod root -H 0/var/pxeinstall/etc/installerconfig
ROOT_PW_HASH must of course be replaced by the real hash of the root password.
The ZFS logic for automated installation is still relatively new in FreeBSD. The installer therefore calls up a dialog with debug information at the end. In the sense of an automatic installation, we force a reboot:
# force reboot into new system
reboot
/var/pxeinstall/etc/installerconfig
You can then log in via the console and start configuring the system. This part is done by Chef.io, whose client we also install automatically using the installerconfig script. The cron job also created for the Chef client ensures registration on the Chef server after the reboot, which then provisions the system by assigning an environment and a run list.
The hardware platform we currently prefer offers an excellently implemented serial console via IP. This is of course fully supported by FreeBSD (there was a time when all screens were serial terminals). The necessary changes to the setup above will follow.
Once again, the advantage of the NFS root file system is evident. Changes to configuration files are trivial to make in the install server and take effect immediately. For a serial console via IPMI on COM1, 9600, 8N1, these changes must be made in the installation root:
console="comconsole"
beastie_disable="YES"
/var/pxeinstall/boot/loader.conf
Unfortunately, the default script on the FreeBSD install CD insists on interactively prompting the user for the terminal type if it is not a local VGA console. This of course prevents an automatic installation. The solution - simply comment out the code:
[...]
else
    # Serial or other console
    #echo
    #echo "Welcome to FreeBSD!"
    #echo
    #echo "Please choose the appropriate terminal type for your system."
    #echo "Common console types are:"
    #echo "   ansi     Standard ANSI terminal"
    #echo "   vt100    VT100 or compatible terminal"
    #echo "   xterm    xterm terminal emulator (or compatible)"
    #echo "   cons25w  cons25w terminal"
    #echo
    #echo -n "Console type [vt100]: "
    #read TERM
    TERM=${TERM:-vt100}
fi
/var/pxeinstall/etc/rc.local
Specifically, this is about the statement read TERM. Get rid of it :-)
These can be transferred to the target system via the script part of /var/pxinstall/etc/installconfig. We are currently using this code in a suitable place:
echo "console=\"comconsole\"" >> /boot/loader.conf
echo "beastie_disable=\"YES\"" >> /boot/loader.conf
/var/pxeinstall/etc/installerconfig