Cancel
Start searching

This search is based on elasticsearch and can look through several thousand pages in miliseconds.
Learn more

In the first part of the Neos workshop, we already set up a virtual environment for the CMS and familiarized ourselves with how the Backendworks. In this part, we’ll now begin implementing our own project in Neos. We’ll use the website for a local wine shop as our example project.
Every new site in Neos starts with the creation of a new site package. The site package contains all the components that define the site’s appearance and basic functionality. To start fresh, we’ll remove both the content and the site package of the pre-installed demo site. The easiest way to do this is via the command-line interface of Flow—Flow is the application framework behind Neos.
To do this, we'll navigate to the Vagrant folder on our system that we created in the last workshop ("cd ~/vagrant-neosbox") and start the virtual machine there with "vagrant up." Then we log in to our virtual machine using "vagrant ssh," navigate to the project folder (/var/www), and execute the following commands:
Note: For the following ./flow commands, it’s important to pay close attention to case sensitivity!
./flow site:prune
composer remove neos/demo

./flow kickstart:site WL.WeinLaden weinladen.local
./flow site:import WL.WeinLaden
In the first line, we use `site:prune` to delete all content and pages from the demo site’s database (you’ll now see an error message at http://http://172.17.28.28/; this is expected). We then use `package:delete` to delete the demo site’s package and remove it from the list of packages installed via Composer.
Now, using `kickstart:site`, we create our new, empty site package, which we’ll name “WW” as the vendor and “WhiskeyWorld” as the package name. With `site:import` in the last line, we import the root page, which is required to display the site.
The Flow command line offers many other useful commands. You can view the complete list by running the command `./flow help `.
For a detailed description of the commands, including all parameters, use the command`
` `./flow help <commandName>`.
The Kickstarter creates a number of directories and files in the Packages/Sites/WL.WeinLaden directory, and I'd like to briefly describe what they are.
.
|-- Classes
|-- Configuration
|   `-- NodeTypes.yaml
|-- Resources
|   `-- Private
|       |-- Content
|       |   `-- Sites.xml
|       |-- Templates
|       |   `-- Page
|       |       `-- Default.html
|       `-- Fusion
|           `-- Root.fusion
|-- Tests
|   |-- Functional
|   `-- Unit
`-- composer.json
If PHP classes are required to implement the site, they are stored in the "Classes" directory and loaded automatically from there. The "Configuration" directory already contains a file named "NodeTypes.yaml," which can be used to define custom content types.
The "Resources/Private" directory contains files that are required for the project but should not be accessible from outside. Among other things, a rudimentary template file and a file for Fusion Code have already been created here.
To make development on our site as convenient as possible, we recommend using an IDE that at least supports syntax highlighting for common web languages. This could be, for example, the lightweight Sublime Text or the powerful PHPStorm.
To work with an IDE on our end, it’s best to copy the files to a local folder. To do this, navigate to the Vagrant directory (~/vagrant-neosbox) and run the following somewhat lengthy command, which copies the files to the neos-workshop folder in your home directory:
rsync -avP --rsh="ssh -i "$(vagrant ssh-config | grep IdentityFile | awk '{print $2}')"" vagrant@172.17.28.28:/var/www/Packages/Sites/ ~/neos-workshopAny changes we make to the SitePackage during the workshop should ideally be automatically copied back into the box. Vagrant provides an elegant solution for this. To use this, we’ll edit the Vagrantfile in our Vagrant folder (~/vagrant-neosbox) and add lines 5 and 6, highlighted below.
These new lines ensure that changes made in the neos-workshop folder are automatically detected by Vagrant and copied to the correct location in the box using rsync.
Vagrant.configure("2") do |config|
  config.vm.box = 'punktde/workshop'
  config.vm.box_url = "https://punkt.de/Download/workshop.box"
  config.vm.synced_folder '.', '/vagrant', id: 'vagrant-root', disabled: true
  config.vm.synced_folder "~/neos-workshop/", "/var/www/Packages/Sites/", type: "rsync",
    rsync__exclude: ".git/"
  config.vm.network 'private_network', ip: '172.17.28.28'
  config.ssh.forward_agent = true
  config.vm.provider 'virtualbox' do |vb|
    vb.memory = '4096'
    vb.cpus = '1'
    vb.name = 'workshopbox'
  end
end
After making the change, the box must be restarted once. This is done using the following command:
vagrant reloadAutomatic synchronization is now available and can be started with the following command:
vagrant rsync-autoNow we're really ready to get started! In the following, we'll expand the files generated by Kickstarter step by step to create a page with a menu, content, and footer section. You can always check out the final result in the GitHub repository for this workshop.
Since we’re focusing mainly on Neos’ features in this workshop, we’ll limit our coverage of other website components—such as HTML, CSS, and JavaScript—to the bare essentials. However, a little color will still enhance our page, so we’ll start by including a CSS file based on the Bootstrap CSS framework.
All directly downloadable files, such as CSS or JavaScript files, must be located in the Resources/Public directory in Neos. Within our site package, we’ll therefore create the file Resources/Public/Styles/Main.css in this path and populate it with the content from https://github.com/punktDe/neos-workshop/blob/master/Resources/Public/Styles/Main.css.
(The quickest way to do this is with `fetch https://github.com/punktDe/neos-workshop/blob/master/Resources/Public/Styles/Main.css`).
Fluid is a simple yet powerful template engine that was developed specifically for the Flow application framework and is also used in the TYPO3 CMS. All constructs used to implement features such as loops or conditions are valid XML markup in their own right. With custom ViewHelpers, the language can be extended as needed and adapted to the requirements of your own project. A description of all language constructs can be found here.
A section has already been provided in the HEAD section of the generated ./Resources/Private/Templates/Page/Default.html file for embedding the file. The Fluid Resource ViewHelper generates the path to the files under Resources/Public for us.
<head>
	<f:section name="stylesheets">
		<link rel="stylesheet" href="{f:uri.resource(path: 'Styles/Main.css', package: 'WL.WeinLaden')}" />
	</f:section>
	<f:section name="headScripts">
	<!-- Put your scripts inclusions for the head here, they will be included in your website by Fusion -->
	</f:section>
</head>
The sections from the template file that are rendered are defined in the TypoScript file ./Resources/Private/TypoScript/Root.ts2.
Here, the menu is also instantiated from the TypoScript object `Menu` using the simple construct `menu = Menu` and made available in the variable `menu`. We can customize the menu’s creation using various parameters. In our example, we need additional CSS classes so that Bootstrap’s CSS takes effect. The line is therefore extended as follows:
menu = Menu {
	attributes.class = 'nav navbar-nav pull-right'
}
Many other parameters of the menu and its elements can be customized this way. A complete list can be found in the Fusion Reference.
Finally, we’ll expand the markup of Default.html to include the menu and a logo for our site.
<f:section name="body">
    <nav class="navbar navbar-default">
        <div class="container">
            <a class="navbar-brand" href="/">Wein<span>Laden</span></a>
            {parts.menu -> f:format.raw()}
        </div>
    </nav>

	<div class="container">
		{content.main -> f:format.raw()}
	</div>
</f:section>Now the page is missing a customizable footer area. This can be achieved with a few minor adjustments to the page configuration, Fusion, and the template, which will be explained step by step below. However, the more detailed background on how Neos stores the data and how we can access it will be covered in the third part of the workshop.
First , in the NodeTypes.yaml file — located in the Configuration directory—we’ll create a new section named “footer” using the following lines:
'Neos.NodeTypes:Page':
  childNodes:
    'footer':
      type: 'Neos.Neos:ContentCollection'
This adds an additional content area for the footer to all newly created pages. This area must now also be added to all existing pages. To do this, we use the `node:repair ` command from the `flow` command set in the console, which updates the existing pages to match the new configuration and adds the footer area to them as well:
./flow node:repairIn the Fusion file Root.fusion, we can now select the footer (lines 7–9) in the same way as the main section and pass it to the template ...
content {
// The default content section
	main = PrimaryContent {
		nodePath = 'main'
	}

	footer = PrimaryContent {
		nodePath = 'footer'
	}
}
... and display it there in the "Resources/Private/Templates/Page/Default.html" template:
<footer>
	<div class="container">
		{content.footer -> f:format.raw()}
	</div>
</footer>
If you want all pages to have the same footer, simply replace the assignment shown above in Fusion with the following. The following lines do not select and edit the footer of the currently selected page, but always the footer of the root page.
footer = ContentCollection {
	nodePath = ${q(site).children('footer').property('_path')}
	collection = ${q(site).children('footer').children()}
}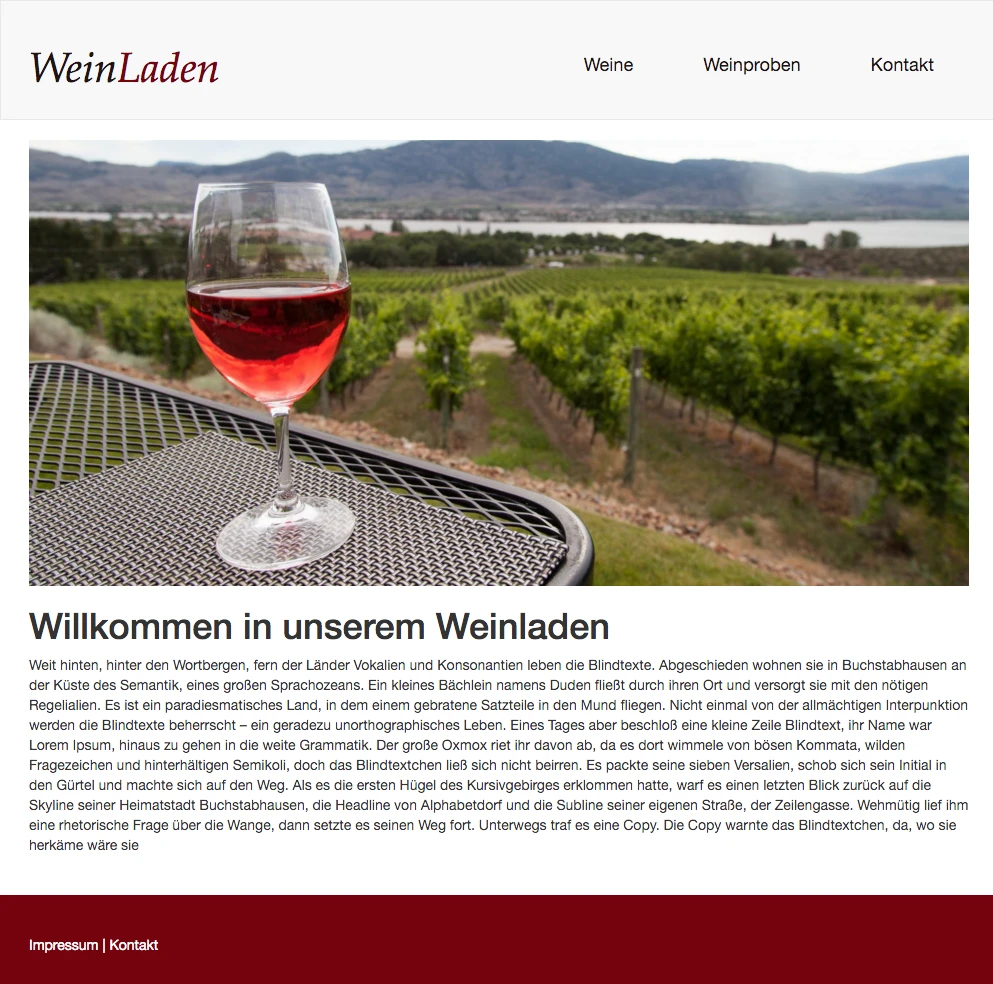
With that, our first page—featuring two content areas and the menu—is complete and ready to be filled with content. You can also check the status of the site package after this part of the workshop in the corresponding GitHub repository.